Since MDriven Turnkey is like any other HTML javascript application, there are no limits to what you can use the data for. Think of MDriven Turnkey as a tool that does the heavy lifting for you – it will free up your navigation item to work with creative things like modeling on one end of the spectrum and special UI design on the other end. MDriven Turnkey's ambition is to swallow everything in between and thus, remove the need for slow and low-quality outsourcing schemes. In Session 9, I show how to replace the auto-generated UI with HTML of your own; how to include a Google map; and how to pick up the location of the device using your application.
To make your experience smooth, we set the main tags mentioned in the video to the right bar menu of this mini-player. Choose an interesting subtitle on the list and immediately get to the exact theme navigation item place in the video. Now you can pick any topic to be instructed on without watching the whole video.
This is the original generic view – use this as a starting point when stirring things up:
@using Eco.MVC
@model AngularModel
@{ Layout = null; }
<h3>{{root._ViewModelPresentation}}</h3>
<form > <!--The only reason for having a form is the ability to simulate a
            postback so that validation is triggered and the error bubbles may show-->
        <!--Body content-->
        <div id="floatingRectangle" ng-show='root._Admin.Loading()'>
            <img src='~/Content/ajax-loader.gif' /></div>
        <div class="container-fluid">
          <div class="row">
            <div class="col-md-2" style="vertical-align:top;">
                @Html.AngualarUIActions(Model)
            </div>
            <div class="col-md-10" style="padding:10px;border-left: lightgray thin solid ;">
                                      @Html.AngualarUI(Model)</div>
          </div>
          <div class="row">
            <div class="col-md-offset-2 col-md-10">
                      @Html.DisplayErrorsWarningsInfos(Model)@*Error,Warning,Info constraints*@</div>
          </div>
        </div>
</form>
@Html.Partial("_DeveloperInfoPartial")
Take a closer look at the parts:
We use Bootstrap to make the original UI responsive – that is why there are no table elements, only div elements.
The data you have access to in your HTML page is strictly derived from the ViewModel.
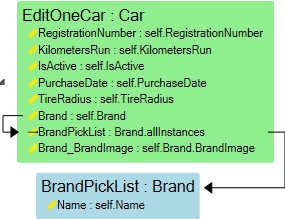
If your ViewModel is defined like this:
then you can expect to find data bindable with AngularJS like this:
root.RegistrationNumber, root.KilometersRun etc
To declare an input id that binds to RegistrationNumber, you would do this:
<input ng-model=”root.RegistrationNumber”/>
In the ViewModel, you also have the enable expression you probably want to use:
<input ng-model=”root.RegistrationNumber” ng-disabled=”!root.VM_Status.EditOneCar_RegistrationNumber_Enabled”/>
Then, you have the visible expression:
<input ng-model=”root.RegistrationNumber” ng-disabled=”!root.VM_Status.EditOneCar_RegistrationNumber_Enabled” ng-show="root.VM_Status.EditOneCar_RegistrationNumber_Visible" />
… do not forget the style:
<input ng-model=”root.RegistrationNumber” ng-disabled=”!root.VM_Status.EditOneCar_RegistrationNumber_Enabled” ng-show="root.VM_Status.EditOneCar_RegistrationNumber_Visible" ng-class="root.VM_Status.EditOneCar_RegistrationNumber_Style"/>
This is how we define select controls (Combobox) for setting the Brand in the above ViewModel:
<select ng-model="root.Brand" ng-options="opt.GetOId() as opt.Name for opt in root.BrandPickList" ></select>
You may use disable, show, and style for this as well.
This is how we make grids:
       <table>
        <thead>
          <tr>
            <th></th>
            <th>Name</th>
            <th>Length</th>
            <th>Genre</th>
          </tr>
        </thead>
        <tbody>
          <tr ng-repeat="video in root.AllVideo">
            <td>  <input type="checkbox" name="input" ng-model="video.vCurrent"></td>
            <td>  {{ video.Name }}        </td>
            <td>  {{ video.Length }}  </td>
            <td>  {{ video.Genre }}         </td>
          </tr>
        </tbody>
      </table>
Notice the first column that uses the vCurrent property that all objects have. This is a Boolean value that sets the vCurrent_NAMEOFVMCLASS variable which is how currency is handled in master-detail UI’s.
If your data is not in the root ViewModelClass but further down in the master-detail chain, the correct way to bind to it is by finding the vCurrent value of that ViewModelClass. This is so common that there is a function declared for it on the _Admin object:
root._Admin.GetCurrentForVMClass('EditOneCar')['RegistrationNumber']
In the case above, this will be equivalent to root.RegistrationNumber – but if EditOneCar was further down in the hierarchy, the proper way to access the currently focused object is with root._Admin.GetCurrentForVMClass('EditOneCar')['RegistrationNumber'].
This Is How You Override One View in MDriven Turnkey
- Create a cshtml file with the same name as your ViewModel. Save it in youmodels_AssetsTK/Views//EXT_OverridePages.
- Name is the Name of your ViewModel, Extension is cshtml.
- When you are done, upload your model
- Your application will then show your overridden page.
No Limits
Since MDriven Turnkey is like any other HTML javascript application, there are no limits to what you can use the data for. Think of MDriven Turnkey as a tool that does the heavy lifting for you – it will free up your time to work with creative things like modeling on one end of the spectrum and special UI design on the other end. MDriven Turnkey's ambition is to swallow everything in between and thus, remove the need for slow and low-quality out-sourcing schemes.
More on View Override
Here's another part of the overriding discussion: an additional example of the UI improvement by means of different features like adding new actions, using site assets, and specifying your own script.
To make your experience smooth, we set the main tags mentioned in the video to the right bar menu of this mini-player. Choose an interesting subtitle on the list and immediately get to the exact theme navigation item place in the video. Now you can pick any topic to be instructed on without watching the whole video.


